Posts

Showing posts from 2018

Using the Memory setting and FN button on Sony Alpha cameras

Image
            Using the Memory setting and FN button on Sony Alpha cameras carlmckienaturephotography                                  This is an often overlooked and under used feature on many camera models, not just Sony Alpha. Partly I think that a lot of people in general do not use their camera anywhere near to its full potential, and stick in fully automatic modes and just move the exposure compensation dial now and again or the other side of the coin where people think they have to dial in the settings every time they change what they are doing—what a waste of time and how many missed shots?? Having a group of settings assigned to a position on the mode dial allows you to quickly change from (for example) action to portrait or static type photography, or still photography to film rather than go through the menu pages changing...

Back button focus on Sony “A” mount cameras

December 2018    Back button focusing takes away the focusing operation from the shutter button and assigns it to either a dedicated, or button on the back of the camera assigned by the photographer. Now the normal set up of most wildlife and sports photographers, and now fast gaining popularity amongst the portrait and landscape set owing to the way back button focus works- focus on the subject and remove your finger from the button and you can recompose the scene (for portraits or scenes where the main subject remains static) as the camera no longer refocuses when you push the shutter button half way down. Fast action such as bird in flight or football players running around, pressing and holding the assigned button down, the camera is continuously focusing on the subject (providing the camera is set up to track a moving subject- more on this later. But when the bird or player stops moving, you can instantly go back to focus and recomposing shots without having to m...

Red Kites in Autumn

Image
                                                   Red Kites in Autumn November 2018, Suffolk England carlmckienaturephotography carlmckienaturephotography/shop

Lightroom Key wording, Part two

                                   Lightroom Key wording, Part two   The key word dialogue box Key wording is a necessary evil, time consuming, tedious but never the less something that needs to be done, it is a primary way to search for your images , or if you send images off to stock agencies how potential buyers will find your image amongst the deluge of images now sent in to such agencies on a daily basis . Lightroom does go some way towards speeding up this process- last posts “key word list” tab when kept organised properly can help, but most people enter key words at the key wording tab. The tab is split into three basic sections, key word tags- key word suggestions and key word sets 1. Keyword tags, this is probably the most used by people, and key words can be typed directly into the main panel and separated by commas (see key wording part one for set up of preferences...

Key wording in Lightroom,

Image
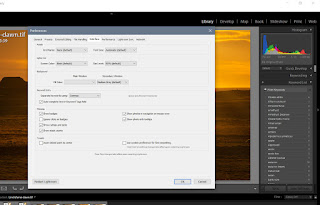
                                         Key wording in Lightroom, Key wording is quite a large topic to cover in one small quick tip so I have split it into three separate parts,  1  The keyword list 2 The key wording panel 3 The methods of applying keywords Before we get into the keyword list, a couple of points worth checking, first in the Preferences dialogue box (command or control comma) and under the interface tab you will find the set up preferences for keyword entry (fig 1 ). Separate keywords using commas and spaces are the options, best set to commas as if you have it set to spaces you will need to put quotation marks around words such as ” New York” or other such long tail keywords so they are recognised as one word. Part 1, the keyword list The keyword list, now this can get very long very quickly as every keywo...

Autumn and the rut

Image
                                                 Red deer in October                               The start of the red deer rut, in early October, and  some nice early morning light                                                                              carlmckienaturephotography

First fungi 2018

Image
                                          October 2018, first fungi The first few fungi images from this year, up to now it has been exceptionally dry with only one days decent rainfall, so fungi are only just starting to appear in any numbers. But with more rain forecast in a day or two, it should be full speed ahead next week                                                                                                                    https://www.carlmckienaturephotography.com/fungi                      ...

Sika stag

Image
                                                     Sika stag in Kent On a recent trip to Kent to photograph Fallow deer, I was surprised to come across this Sika stag- not that I didn't know they where about in this area, but that it was so confiding and happily went about its business without paying any attention to me. Normally these deer are very nocturnal in there habits and particularly shy                                            carlmckienaturephotography

Greeting cards

Image
                                                 Greeting cards New greeting cards now on web site.                                                                  carlmckienaturephotography.com                                                                 

Auto stack for HDR and Pano

Image
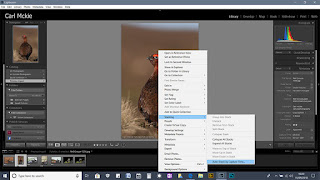
                                  Auto stack for HDR and Pano A very useful feature in Lightroom is the Auto stack, I use this feature mostly when creating HDR or Panoramas, but it can be useful when shooting at the full burst rate of the camera (ie 12frames per second). It helps keep a clearer workspace and makes for easy access to a group of images, without having to try and work out the start and end of groups. It is customisable   To access the feature, first highlight the folder (or collection) you wish to create the stacks in, then right click on an image in the film strip (or the image itself) to bring up the menu-scroll down to stacking, then in the sub menu go to Auto stack by capture time.   This brings up a dialogue box set by default to one minute, and can be adjusted by moving the slider left (less time) or right (increase time).So if you where to set the time t...